Working with Card Accounts
Once your business account has been created and funded, you are ready to begin creating card accounts. We recommend creating card accounts using the name and information of the actual user to assure consistent merchant acceptance. It is possible to create a “generic” card account that is not assigned to a specific or single user (e.g. “Purchasing Department”) if needed for a business process.Regardless of how the card account is created, the following fields are required in the POST/Card/CreateAsync API:
● First Name/Last Name: name to be embossed on the card.
● Profile Contact Name
● Street Address (2 lines available), City, State, Zip Code
● Phone, Date of Birth, Email*
● Shipping Contact Name and Phone
● Shipping Address (2 lines available), City, State, Zip Code
● Shipping Method
- First Class USPS (expected 10 business day delivery time
- Expedited Courier Delivery (expected 4 business day delivery time)
- Rush Courier Delivery (expected 3 day delivery time)
- First Class USPS (expected 10 business day delivery time
- Expedited Courier Delivery (expected 4 business day delivery time)
- Rush Courier Delivery (expected 3 day delivery time)
*These fields are included largely for servicing purposes. If a card is created that will not be assigned to a single user, make sure all users know what values were loaded into these fields and profile address fields, to assure that they can access servicing and respond to any merchant processing validation questions.
EX: Zip code is commonly used as a secondary validation measure after a card is swiped.
- Use Card/CreateAsync endpoint to place an order to create one or more cards
- Card/CreateAsync gives a CardOrderId as a response.
- You can use GET CardOderId/{Id} to check status of individual cards
- If status = failed, card will not be created. Please correct the validation errors and resubmit the card order using Card/CreateAsync for all failed cards.
- If status= successful, these cards will be created and sent to you in mail.
- The Card Status Change webhook can also be used to verify if the card accounts are created successfully or not. For each card account created successfully, the Card Status Change webhook will be triggered with card status = inactive
Spending Rulesets
Spend controls in the PEX platform can be added, edited and customized to limit card useage to authorized business purposes.The following spending controls are supported:
● Daily spend limit: amount in dollars that can be spent (in aggregate) throughout the course of a day (12:01AM - 12:00AM)
● International use: whether or not card can be used outside the United States
● Card Not Present use: whether or not card can be used for internet, telephone or mail order transactions
● Merchant Categories: allow or prohibit use in any or all of the 12 supported merchant categories
Spending rulesets are preconfigured spend control groups that are named and assigned an ID so that they can be included in the POST/Card/Create API. Typically they are built around job roles or purchasing responsibilities at the company. Spending rulesets are created in the Admin portal in the Cards/Spending Rulesets tab.
EX: You can create one spending ruleset for local sales people, another for traveling sales people and a third for office managers.
Using the Admin portal, navigate to the Cards/Spending Rulesets page and you can create spending rulesets or revise existing rulesets.
If a spending ruleset ID is not included in the POST/Card/Create API, the default spending ruleset will be assigned to the card:
● No daily spending limit
● International transactions NOT allowed
● Card Not Present transactions ARE allowed
● All Merchant Categories ARE allowed
Spending controls can be added to a card account after that card account is created, using the PUT/SpendRules/{ld} API.
You can retrieve a list of spend rulesets that are currently applied to any card account using the GET/SpendRules/{ld} API.
To retrieve all available spending rulesets for your company including ruleset IDs, use the GET/Bulk/GetSpendingRulesets API.
Groups
Use Groups to organize cardholders for reporting or batch administration purposes. You can create Groups using the POST/Business/Group API.You can also create a new group in the Admin portal by accessing the Card/Card List page, clicking on any record in the Groups column, and clicking on “Create New”.
Retrieve a list of your company’s groups (including the group ID) using the GET/Group API.
Retrieve a list of all cardholders in a group using the GET/Group/{id} API.
Update a Group Name using the PUT/Group/{id} API.
Group Names are limited to XX alpha numeric characters. Only the first 14 characters of the Group name will be displayed on the "Card List" and "Search" pages in the Admin portal.
Loading Funds to Cards
Once card accounts are created, you can begin loading funds onto the cards so they may be used for company-approved expenses.- Use the POST/Card/Fund/{ld} API to load or remove funds from individual cards.
- Use the POST/Card/Zero/{ld} API to bring any card balance to zero.
- The POST/Bulk/Zero API allows you to bring all of your company’s card balances to zero simultaneously.
- The PUT/Bulk/FundAllCards API allows you to add a fixed dollar amount to every one of your company cards simultaneously.
You can load funds to cards up to the amount available in your company’s business account. Funds that are removed from cards are credited back to your company’s business account and made available for loading to other card accounts. In the Admin portal, use "GET --> Details --> Account Details" to view your company’s business account balance.
See the “Establishing the Business Account” section for details on how to move funds from your company’s bank account to your company’s PEX business account.
Working with Card Transactions
A typical PEX card transaction flow is as follows: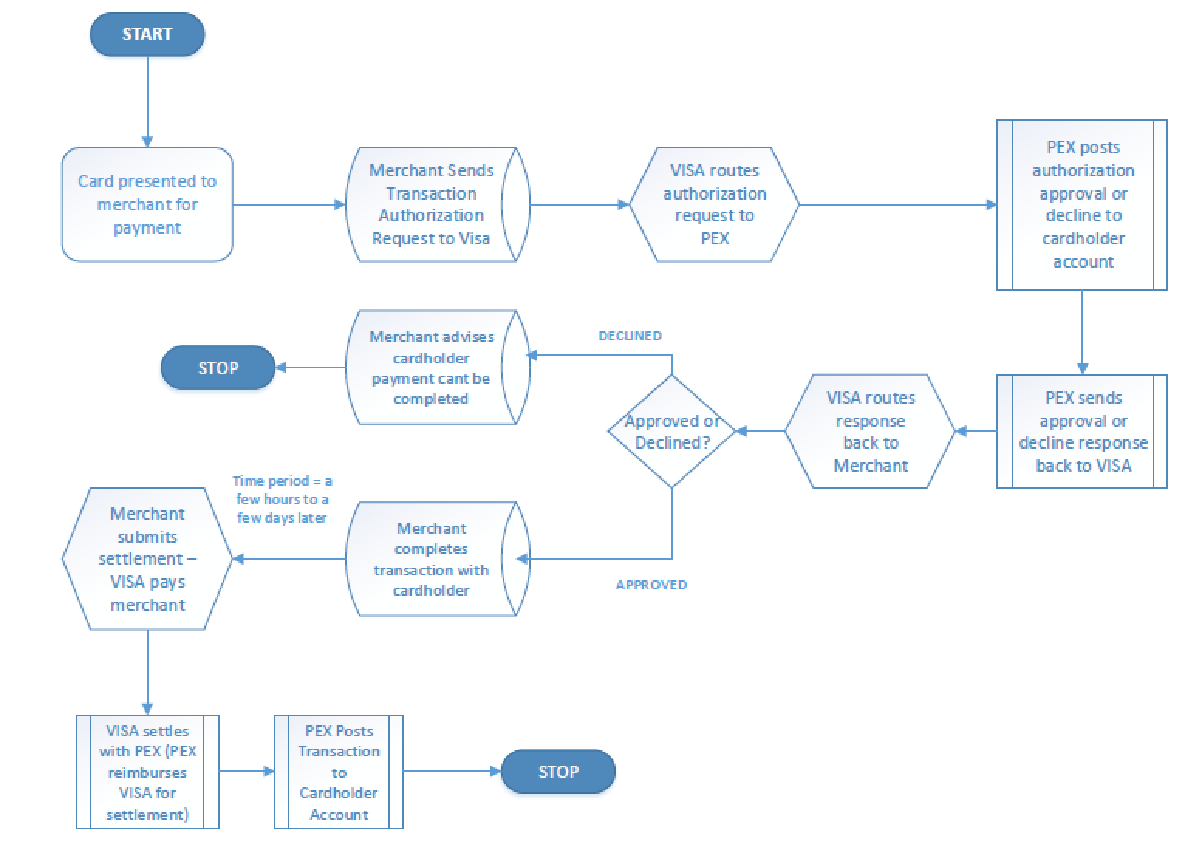
However, not all transactions will follow the flow depicted above.
Expired Authorizations: Cardholders may occasionally have transactions that are authorized but never settled. This can happen when a merchant starts a transaction and the cardholder decides he doesn’t want to complete it (e.g. changes his mind about buying the widget). It can also happen when a merchant submits an authorization to make sure that the card is valid before the actual transaction occurs.
EX: A hotel submits an authorization for one night’s worth of your multi-night hotel stay when you check in, but not authorizing and settling the entire charge until you check out.
Authorization Hold Times: PEX will maintain a hold on cardholder funds based on an authorization request until one of the following occurs:
● The authorization is matched to a settlement transaction. When this occurs, the authorization is released.
● 3 days passes without a matching settlement transaction and the authorization request was from a merchant using the Fuel merchant category code
● 14 days passes without a matching settlement transaction and the authorization request was from a merchant using the Hotel merchant category code
● 5 days passes without a matching settlement transaction and the authorization request was from a merchant using any other merchant category code
Force Post: Merchants do have the ability to submit a settlement to Visa that was not submitted for authorization first. This is called a Force Post. In most cases, merchants will not do this as they bear the risk of loss on unauthorized transactions. It should be noted that for smaller transactions, and in cases where the merchant knows the cardholder well, you may see a force post settlement.
Merchant Credit: If a cardholder returns merchandise or registers a complaint about goods or services, the merchant will provide a refund in the form of a credit to your employee’s card.
Accessing Transaction Histories
Use the GET/Details/AllCardholderTransactions API to access all cardholder transactions for your company in a given date range.*Note that if for the time-frame selected, over 30,000 transactions are returned, then the results will be paginated (sequenced into pages using numbers or characters).
To retrieve more data, use the ‘LastTimeRetrieved’ field returned in the StartDate parameter and repeat the call until the ‘NumberOfPages’ field = 1. *Note: the last transaction for the page will be the first transaction retrieved in the next call, use the TransactionId to eliminate duplicate records.
Also note that this API is limited to 10 hits/hour. Most expense cards are used moderately, 4 to 5 times per day, so accessing a company’s cardholder transaction history periodically throughout the day (once every hour or two) and using cached results to drive your front end, will work well for almost any company. If your program has unique needs that may require more frequent transaction history updates, please ask your API support manager for help structuring your API usage.
Transaction histories for individual accounts can be accessed using the GET/Details/TransactionDetails/{Id} API. You can also retrieve a transaction count for any specific cardholder using the GET/Details/AllCardholderTransactionCount API. All cardholder transaction APIs allow you to include or exclude authorizations and declines (settled transactions are included in all responses).
Transaction Notes
You can add an unlimited number of alpha numeric transaction notes to cardholder funding transactions, authorizations or settled transactions. Transaction notes added to authorizations are automatically copied to the matching settlement transactions. Transaction notes can be viewed on the Admin site in transaction details, they will appear on certain reports and are also included in transaction details API responses.Transaction notes are useful for linking a card transaction to an expense approval, customer order number, or other identifier that your company reconciliation process(es) might require.