Authentication
OAuth is an open protocol that allows your application to request secure access to private details in a user's PEX account, without their password.Registering Your Application
To get started, follow these steps:Register your app by signing up for a developer account on the PEX Developer Portal (https://developer.pexcard.com)
You will receive a unique AppId (also called Client ID) and AppSecret (also called Client Secret) to use in the OAuth flow. You can view the AppId and AppSecret by clicking the lock icon in the portal to reveal their values. Do not share your AppSecret with anyone.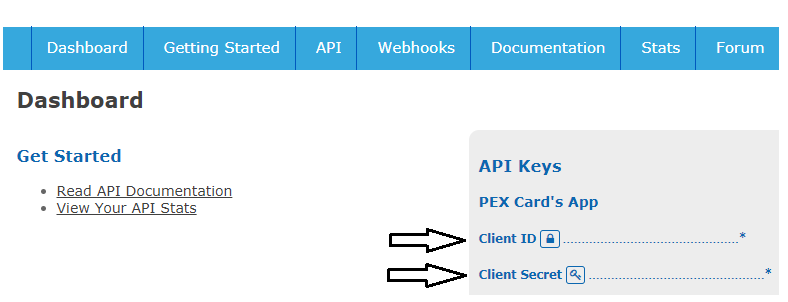
The OAuth Flow
PEX uses the standard OAuth flow to grant access tokens to users. For more information about the OAuth grant flow, see the OAuth documentation (https://tools.ietf.org/html/rfc6749#section-4.1)
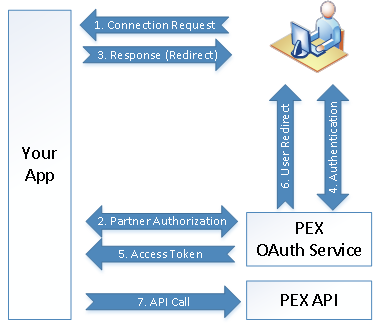
Step 1: Connection Request
A user requests to connect your application to PEX. This request is typically triggered by the user clicking a button within your app. Once the user clicks this button, the OAuth flow is triggered.
Step 2: Partner Authentication
You must authenticate your app with PEX. Your application should submit your App credentials to the PEX OAuth Service in order to continue the authorization flow.
Authentication Request:
Method: POST
URL: https://oauth.pexcard.com/Auth/Partner
Headers: Content-Type: application/json
Body:
{
"AppSecret": "ab1234c45a67a8fd662efd879063e9e",
"ServerCallbackUrl": "https://www.myappurl.com/pexconnectorcallback",
"BrowserClosingUrl": "https://www.myappurl.com/welcome"
Description of Fields:
Authentication Response:
Status Codes200: Indicates that your app is authorized
400 or 401: Indicates that your app is not authorized
Body:
{
"OAuthUrl": "https://oauth.pexcard.com/Home/Auth?sessionid=123-abc-456-def-789"
}
Response Description
OAuthUrl: Users should be redirected here to authenticate their PEX credentials.
*NOTE: This URL is valid for only 1 hour after it is issued by the PEX OAuth servers.
Step 3: User Redirect
Upon receiving the response from the PEX OAuth server, your app should redirect the user to the URL returned in the Authentication Response “OAuthUrl” field.Step 4: Authentication and Authorization
Once the user is redirected to the PEX OAuth URL, PEX will present the user with a login form prompting them to relay their PEX credentials. Upon entering their credentials, PEX will authenticate the user, and determine what features they are authorizing your application to access.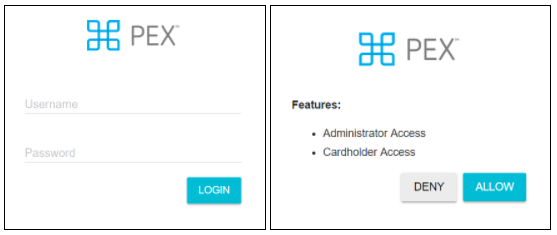
Step 5: Access Token
Once the user is successfully authenticated, and the user has authorized your app to have the features that your plan allows, PEX will send a token to your app and redirect the user to the requested URL.Access Token Callback:
Method:	POST

URL:		Provided by the app in the Authentication Request Message (ServerCallbackUrl).

Headers:	ContentType: application/json


Body:


{

	"Token": "ad12abb4e2034c3aa77f093433b6b61c"

}
Step 6: User Redirect
PEX will redirect the user to the URL provided in the Authentication Request Message (BrowserClosingUrl). This redirect will occur whether or not the user grants access to your app.
Once you have received a token from the PEX OAuth flow, you can use this token to access resources on behalf of your user. For further details on what calls are available, see the documentation on the PEX Developer Portal (https://developer.pexcard.com).
Revoking Tokens
The PEX OAuth server also supports revoking tokens. If your app needs to revoke a token, you can use the following endpoint:
Method:	POST

URL:		https://oauth.pexcard.com/Auth/Token/Revoke

Headers:	Content-Type: application/json


Body:


{

"AppId": "de16bdc8",

"AppSecret": "ac9893c50a93a2ded662efd879063e9e",

"Token": "ef21acc9e2034c3aa77f093433b6b61c"

}
Description of Fields:
Status Codes:
200: Token has been revoked
400 or 401: Token was not revoked
Security Considerations for Connecting to PEX
- Storing Application Credentials:
Your application credentials uniquely identify your application to PEX. You must protect these credentials. You should only allow a limited number of your developers access to the PEX developer portal. This should be a select group that requires to the credentials. Although the Client ID may be shared freely, your Client Secret should be closely guarded. Never embed your Client Secret within a distributed application (such as a mobile app), and never send it to your users’ browsers (ex: client-side javascript). - Storing User Tokens: Tokens securely authenticate your access on behalf of a PEX user. The tokens must be stored in an encrypted manner on your servers. Never embed these tokens in either a distributed app (such as a mobile app) or client-side javascript.
- Secure Data Exchange: PEX URLs will always be protected via SSL. Similarly, your app should only expose URLs via SSL. The certificates on your app must be valid, or PEX will not be able to send data to your app.
Common problems
- Username / password mismatch: Is the User Name/Password combination you are using from Sandbox or Production? A production user name/password combination won't work in sandbox and vice versa.
- General authentication error: Is your application using TLS 1.2? PEX depricated support for TLS 1.0 in early 2018.
- PEX offers a sandbox environment to help you test your code. If you are testing using sandbox credentials, be sure to use the sandbox oauth URL: https://sandbox-oauth.pexcard.com.